Overview
By default, Expedient configures clients with 2-factor authentication (2FA) to Expedient Enterprise Workspace (EEW) with OneLogin as an identity provider. If it is preferred, a client has the ability to substitute OneLogin for a different SAML identity provider and 2FA solution that their users may already be utilizing for access to other applications. Examples of alternative identity provider and 2FA solutions include the Azure AD, Duo, and Okta. If a client chooses to use a non-Expedient managed identity provider it is the responsibility of the client to manage that solution. While Expedient may not manage these alternative solutions, Expedient is providing this documentation to assist clients with getting started with integrating their 2FA solution with Expedient Enterprise Workspace. This document outlines the process for securing Expedient Enterprise Workspace with Azure AD login.
Prerequisites
The steps described in this document assume that the client has already configured their on-prem Active directory to sync with their Azure Active Directory tenant.
This document assumes that you have already configured an MFA policy for your users within AAD that requires them to use a 2FA sign in method like the Microsoft authenticator, SMS, or email.
Process
Retrieve Workspace One Access SP metadata xml
Log into your desktop portal as a user who is a member of your EEW admins group. Access the administration portal via the profile button on the top right.
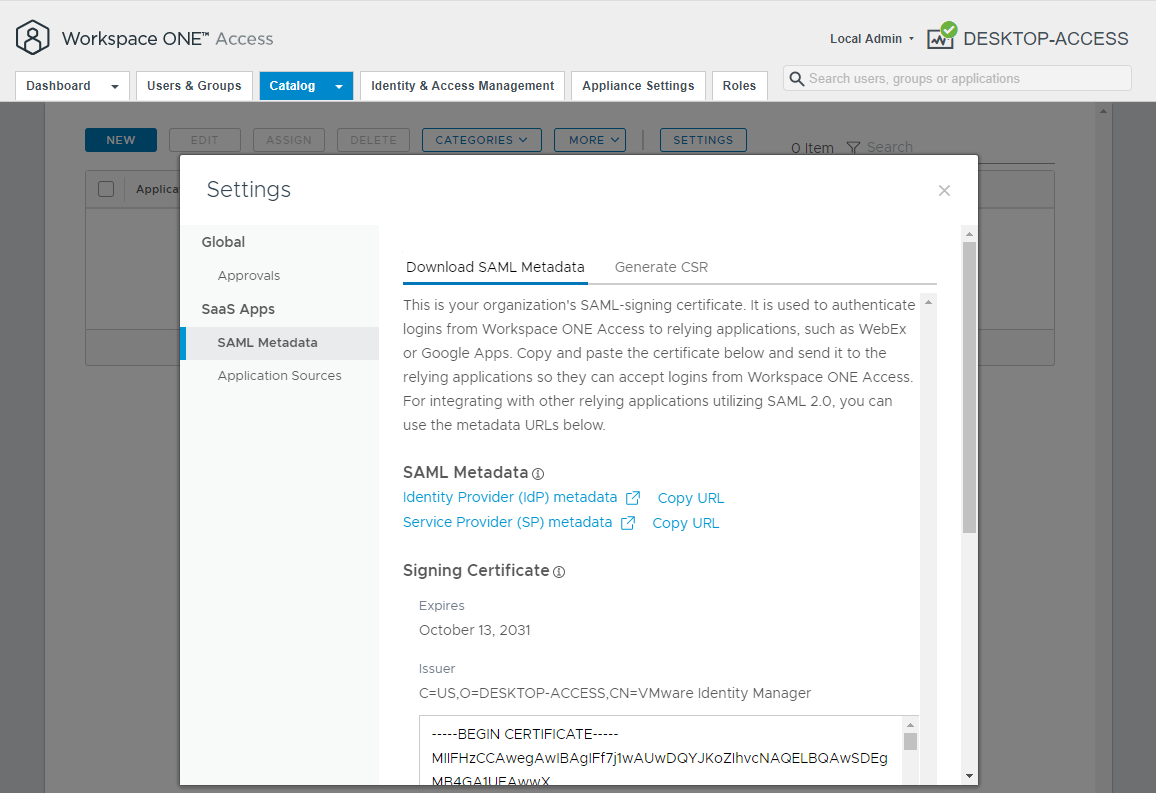
Click on the Catalog tab and on the Catalog page click the Settings button
On the Settings dialog box, go to the SAML Metadata section and click on the Service Provider (SP) metadata link to download the sp.xml file
From within the sp.xml file, identify the values for entityID in the first line and the Location value on the AssertionConsumerService HTTP-POST line. The two values should look something like the following
https://desktop-access.contoso.com/SAAS/API/1.0/GET/metadata/sp.xml
https://desktop-access.contoso.com/SAAS/auth/saml/response
Create Azure Enterprise Application
Log into your Azure Portal as an administrator.
Go to the Enterprise Applications section and click New Application.
On the Browse Azure AD Gallery page, click Create your own application
Name the application something that references Expedient Enterprise Workspace and leave the radio button set to "integrate any other application you don't find in the gallery (Non-gallery)"
Once the enterprise application is created, on the Single sign-on section off the enterprise application, click edit next to the Basic SAML Configuration section. Using the information you gathered from the sp.xml from Workspace One Access, fill in the "Identifier (Entity ID)" field with the entityID value and fill in the "Reply URL ( Assertion Consumer Service URL)" with the value you gathered for HTTP-POST. Once you've defined both values click save.
On the Attributes & Claims section reconfigure the required claims and additional claims lists to match exactly as listed below. Note that these are case sensitive and need to look exactly as listed below.
Required Claim | |
Claim name | Value |
Unique User Identifier (Name ID) | user.mail |
Additional claims | |
Claim name | Value |
distinguishedName | user.onpremisesdistinguishedname |
user.mail | |
firstName | user.givenname |
lastName | user.surname |
userName | user.netbiosname |
userPrincipalName | user.userprincipalname |
Once you've saved the attributes and claims click download next to Federation Metadata XML under the SAML Signing Certificate section.
Also copy the Logout URL that is listed on the Single sign-on page under section 4.
On the Properties section of the enterprise application set the "Assignment required" radio button to No and the "Visible to users radio button" to No. After changing those settings click save.
Configure AAD IDP in Workspace One Access
Switch back to your Workspace One Access admin portal and under the Identity & Access Management tab click the Identity Providers sub tab and click the Add Identity Provider and select the Create Third Party IDP option
Use the following as a guide for what to configure for each option on the new IDP page
Identity Provider Name | Set this to "AzureAD" | ||||||
Binding Protocol | you will not see this section until you fill in the SAML Metadata section but when it appears leave it the default of "HTTP Redirect" | ||||||
SAML Metadata | Copy the contents of the xml file that you downloaded from Azure for the enterprise applications Federation Metadata XML and click Process IdP Metadata Leave the Identify User User option as "NameID Element" Add in the following two values under the "Name ID format mapping from SAML Response" section by clicking the plus icon. The values are case sensitive.
Set the value for Name ID Policy in SAML Request to urn:oasis:names:tc:SAML:1.1:nameid-format:unspecified Leave the Send Subject in SAML Request (when available) box unchecked | ||||||
Just-in-Time User provisioning | leave unchecked | ||||||
Users | check the box for the AD domain | ||||||
Network | check the box for ALL RANGES | ||||||
Authentication Methods | Add in the following
| ||||||
Single Sign-Out | Check the box to enable Set the value of IdP Sign-out URL to the Logout URL value you copied from the AAD enterprise application |
Once you've configured the values above, click Save
Change Workspace One Access authentication method to Azure AD
Important Note: In this step you will be changing the authentication method used to log into Expedient Enterprise Workspace. Please note that if there is something wrong with your configuration in the previous steps, either within Azure or Workspace One Access, there is the potential for you to be unable to log into the platform. If this happens to you, please contact the Operations Support Center and inform them that you were following this document and a misconfiguration has caused you to be unable to log into he platform and that you need your change reverted. We will use our own admin login to the Workspace One Access appliance and revert the authentication method back to its previous value which will restore your access to the platform.
On the Identity & Access Management tab of the Workspace One Access admin portal click the Policies sub-tab.
Select the default_access_policy_set and click edit
On the Configuration step of the Edit Policy wizard you will see two values in the list called ALL RANGES. Click on both values and set the value for "then the user may authenticate using" to "AzureAD" and click save. Once you have done that to both ALL RANGES in the list click next in the wizard and save.
At this point, access to your EEW environment will now redirect your users to Microsoft to authenticate before presenting them with the desktop portal. After making this change it is important to test this to ensure the authentication is working as expected. To do this, open an an incognito or private browsing window and go to your desktop URL and confirm that you are redirected to Microsoft and that you are able to log into the desktop portal. Performing a test login in an incognito/private window will ensure that you are initiating a fresh login with no stored credentials or sessions so that you can validate the process is working from end to end.