Introduction
Before you register your Microsoft 365 domain with Cohesity and protect Exchange Online data, ensure the following prerequisites are met:
- Create a new user and configure the required roles for your Microsoft 365 user account. For more information, see User Roles and Application Permissions.
- Custom Azure Application with the requisite permissions. For more information, see User Roles and Application Permissions.
- You must open specific ports in the firewall to allow the Cohesity cluster to protect Microsoft 365 Exchange Online data. For information on the required ports, see Firewall and Port Requirements.
- Review and understand the Considerations and Best Practices.
While registering Microsoft 365 domain on Cohesity, ensure that you provide the user account details with all the specified roles. For more information, see Register Microsoft 365 Source Within Cohesity.
Register Custom Application on Azure Portal
Register a custom app on the Azure portal for Cohesity to connect with your Microsoft 365 account. You can also refer to the following topics on the Microsoft Docs portal for the latest procedure to register a custom app:
- Create a custom application; see Register an application with the Microsoft identity platform topic on Microsoft Docs Portal.
- Configure API access and assign appropriate permissions; see Configure a client application to access web APIs topic on Microsoft Docs Portal.
Ensure that you note down the app ID and access key while registering the custom app. The app ID and access key are required to register Microsoft 365 within Cohesity.
Register the Custom Application
Perform the following steps if you register an app for the first time.
If you have already registered an app within Cohesity to protect any supported Microsoft 365 applications, make sure that you edit the app and provide the required permissions.
To register an app on Azure Portal:
- Log in to the Azure Portal with your Microsoft 365 administrator user credentials.
- Search for and select Azure Active Directory.
- Select App Registrations > New Registration.
- Enter a Name for your app, select the Supported account types that can access the app, and enter https://localhost as the Redirect URI. Click Register.
- On the RegisteredApp page, click Overview and copy the Application (client) ID. You need to use this ID to register Microsoft 365 as a source on Cohesity.
- If the Microsoft 365 source tenant has OAuth enabled for secure communication, perform these additional steps:
- Click API permissions > Add a permission > APIs my organization uses.
- Search for and click Office 365 Exchange Online (Use the complete app name.)
- Click Application Permissions.
- Under Other Permissions, select full_access_as_app to enable OAuth and click Add Permissions.
- After adding the permissions, click Grant Admin Consent and click Yes to confirm.
- On the same page, select API permissions > Add a permission > Microsoft Graph API.
- Click Application Permissions, add the required App Permissions, and click Add permissions.
- Again, on the same page, select API permissions > Add a permission > APIs my organization uses > Office 365 SharePoint Online.
- Click Application Permissions, add the required App Permissions, and click Add permissions.
- Under Grant Consent, click Grant admin consent for <domain_name>.
- Under App Registration, click the application name that you entered previously.
- Next, you need to add a new client secret (or “App Secret Key”) that the app can use to prove its identity when requesting a token. Click Certificates & Secret > New client secret.
- Enter a Description, select Never under Expires, and click Add.
- Under Client secrets, click the Copy button next to the string under Value.
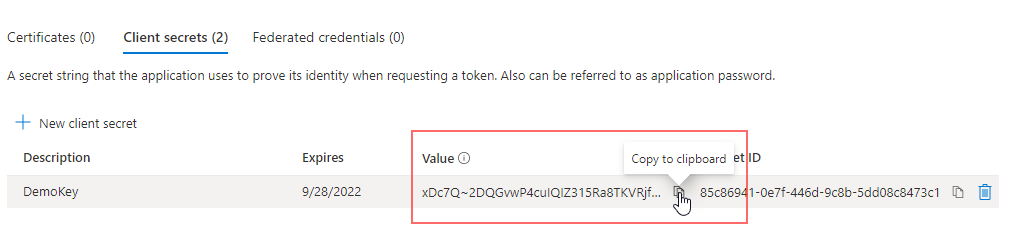
Save this value in a safe location. You need this value to register Microsoft 365 as a source in Cohesity.
Configure Tenant Permissions
After registering the custom app, configure the tenant permissions on the custom app.
Custom Scripts are needed for recovering the SharePoint Online sites to the Microsoft 365 tenant or alternate Microsoft 365 tenant.
- Launch the SharePoint Admin Center using the URL: https://your-tenant-admin.sharepoint.com/_layouts/15/AppInv.aspx
- Enter the App ID field's AppID of the custom app you have created. Click Lookup to search for the custom app.
- In the App Domain: field, enter www.localhost.com.
- In the Permission Request XML field, enter:
<AppPermissionRequests AllowAppOnlyPolicy="true">
 <AppPermissionRequest Scope="http://sharepoint/content/tenant" Right="FullControl" />
 <AppPermissionRequest Scope="http://sharepoint/content/sitecollection" Right="FullControl" />
 <AppPermissionRequest Scope="http://sharepoint/content/sitecollection/web" Right="FullControl" />
 <AppPermissionRequest Scope="http://sharepoint/content/sitecollection/web/list" Right="FullControl" />
 <AppPermissionRequest Scope="http://sharepoint/taxonomy" Right="Read,Write" />
</AppPermissionRequests>
- Click create.
- In the Do you trust <app_title>? page, click Trust It.
For recovering sites to the Microsoft 365 tenant or an alternate Microsoft 365 tenant, you also need to configure the following recovery permissions on the tenant:
- Launch the tenant settings using the following URL: https://your-tenant-admin.sharepoint.com/_layouts/15/online/TenantSettings.aspx
- Under Custom Scripts, enable: (scroll down to the bottom of the page)
- Allow users to run custom scripts on personal sites.
- Allow users to run custom scripts on self-service-created sites.
- Click OK.
IMPORTANT: If you have created your Microsoft 365 tenant on or after Sep 20, 2020, you must install SharePoint Online PowerShell. Using the global administrator account, run the following commands in an administrator PowerShell session:
Get-Module -Name Microsoft.Online.SharePoint.PowerShell -ListAvailable | Select Name,Version
[Net.ServicePointManager]::SecurityProtocol = [Net.SecurityProtocolType]::Tls12

Install-Module -Name Microsoft.Online.SharePoint.PowerShell -Scope AllUsers

Connect-SPOService -Url 'https://<tenant>-admin.sharepoint.com'

Set-SPOTenant -DisableCustomAppAuthentication $False