Overview
This document is intended for clients utilizing the new generations of Expedient Enterprise Cloud (EEC) to gain an understanding of how to effectively utilize IP Spaces when configuring networks within their EEC environment.
Please note that the details described in this document are applicable to most clients EEC environments, but certain clients network configurations may vary. If you have any questions specific to your environment, please contact Expedient support.
What is IP Spaces?
IP Spaces is a feature that manages IP subnet allocation and is a necessary component in controlling which client networks in EEC are advertised to clients’ upstream virtual firewall. With IP spaces, a network can be created in EEC by either explicitly defining the network’s subnet from a list of subnets that have been manually reserved for a specific use, or by having the network’s subnet be automatically selected from a list of unused subnets that can be allocated on demand. When creating a network in EEC a subnet gateway must be defined for the network. Whether the network’s subnet is manually defined or allocated automatically, that subnet must be defined within the IP Spaces IP Prefix list and not currently in use by another network.
Getting started with IP Spaces
When getting started with IP Spaces, it is helpful to understand the IP Spaces IP Prefix list. The IP Prefixes list is the range of IP subnets that can be consumed within EEC. Each entry on the IP Prefixes list could be a single subnet or a supernet containing a set number of subnets that can be used within the supernet. Once the IP Prefixes list is defined, the next step is to allocate those subnets for the IP Space to manage usage of. The act of allocating IP Prefixes should not be confused with actually making use of those subnets on the network. When defining an IP Prefix list, it is preferred to allocate all IP Prefixes up front. When allocating IP Prefixes, they will go into an “unused” state. This will allow the flexibility to set selected networks as reserved for manual use, allow for manual definition of network CIDR gateways at the time of network creation, or allow an unused subnet to be requested at the time of network creation.
Practical Example
Consider the following example of how IP Spaces may be used in EEC.
Assume it is decided that all subnets utilized within the EEC environment will be /24 networks (255.255.255.0) and fall within the 192.168.0.0-192.168.255.0 subnet range.
Start by editing the IP Space IP Prefix list to add an entry for 192.168.0.0/24 and specify 8 subnets in that sequence.
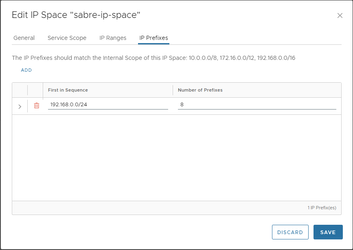
The IP Prefixes list will reflect the change, showing that none of the prefixes in that range have yet been allocated.

Then, go to the IP Spaces IP Prefixes allocation view and allocate 8 /24 networks. The Allocate IP Prefixes dialog box only allows 5 prefixes to be allocated at a time, but the process can be repeated to allocate more.
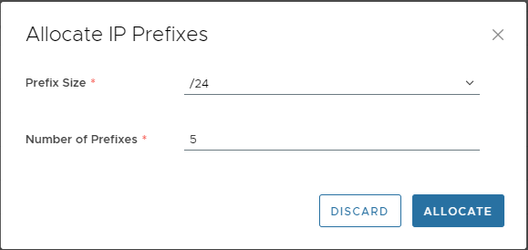
Once the networks have been allocated, 8 allocation entries can be seen listed as “unused”.
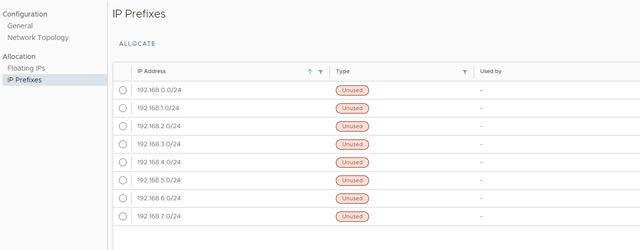
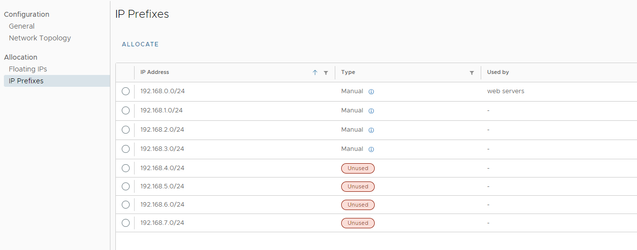
At this point, assume the 192.168.0.0/24 through 192.168.3.0/24 networks have already been decided to be reserved for specific uses. They can be set as “manual use”, and 192.168.4.0/24 through 192.168.7.0/24 can be left as “unused” to be used as needed at a later time.
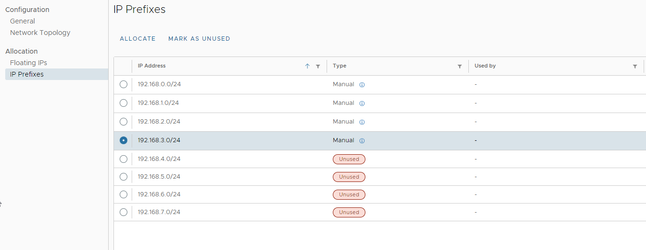
Now that the EEC IP Prefixes have properly laid out, networks need to be created for use with virtual machines. Start by creating a new “web servers” network and manually specify 192.168.0.1/24 as the networks CIDR gateway and connect it to a Tier-1 router. Enable the “Route Advertisement” option when creating the network if the network should be routable from other parts of the network outside EEC.
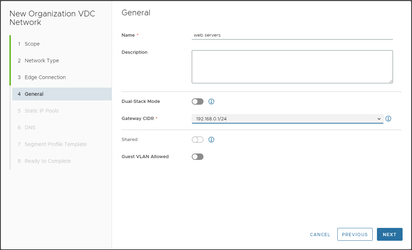
Once the network has been created, review the IP Spaces allocation, and observe that the 192.168.0.1/24 IP Prefix is in use by the “web servers” network.
To illustrate one last point, assume that another user in the company needs a network to be created in EEC for a new application; however, they do not need a specific subnet. That user could create a new network by using the option on the network creation wizard to automatically request a network from the IP Space in the 192.168.4.0/24 through 192.168.7.0/24 range that was not reserved for manual use.
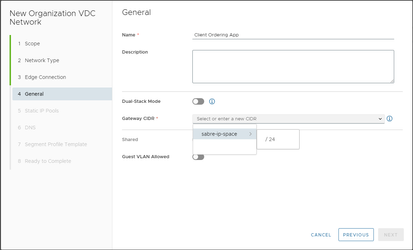
For that user, 192.168.4.1/24 gets automatically reserved as the network is created.