Introduction
Occasionally, OneLogin makes a new ADC Agent available. This covers the process for upgrading an agent.
Intended Audience
Clients who have ADC software installed on servers that are not managed by Expedient. If there are multiple ADCs connecting to different domains, they must each be reviewed and upgraded
Prerequisites
Download the installer
The latest version can be found at https://download.expedient.com/OneLogin
Username: expedient
Password: publ1c
Find Servers Running ADC
If you are unsure which server is running the OneLogin ADC agent, a search can be done from any Domain Controller
Basic domain server search: (may take a while if a lot of domain members)
Get-ADComputer -Filter { Enabled -eq $true } | ? { Get-Service -ComputerName $_.Name -DisplayName OneLogin* } | select Name
If there are a large amount of domain servers, may need to add additional filters
...
{ Enabled -eq $true -and Name -like "*partialhostname*" } ...
Ensure Credentials are Known
The ADC connects to Active Directory with domain credentials. If there are multiple ADCs connected to a single domain, they should use the same credentials.
Review the Config file
Any customizations made to the agent can be found in the following directory
C:\Program Files (x86)\OneLogin, Inc\OneLogin Active Directory Connector\ConnectorService.exe.config
Any customizations can be in the applicationSettings XML leaf. If there are customizations to the .config file, make a copy of the config file. These customizations will need to be copied from the old to the new config file during the upgrade.
Upgrade Process
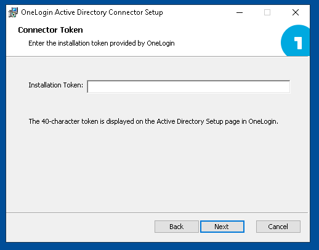
Run the new Installer (.msi file)
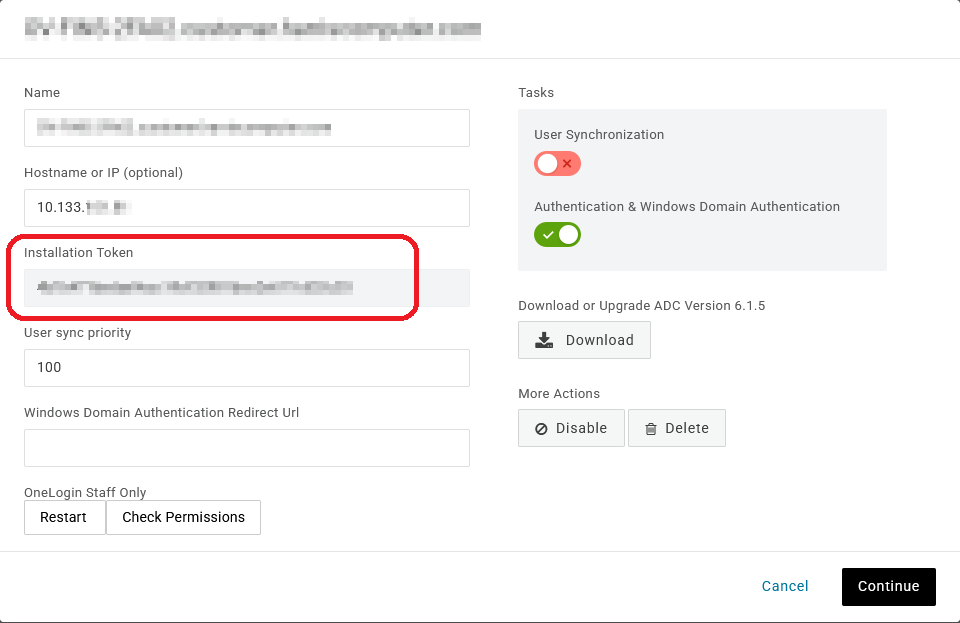
Enter the Installation Token from the ADC page in OneLogin portal
Each ADC has a unique Installation Token
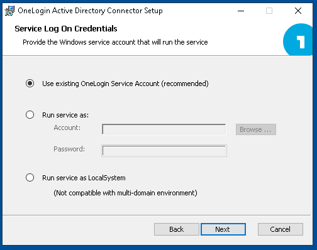
Select Use Existing Account
Default port 8080
US shard
Install
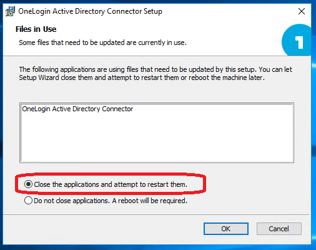
Because ADC is running, it will ask to stop and restart the service
Wait for the installation to complete
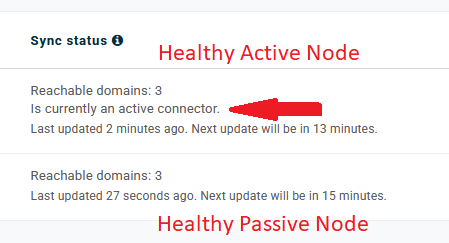
Confirm in OneLogin portal that the ADC is showing the new version and is healthy
Wait the FULL 15mins for the ADC to complete the first sync

If Upgrade option fails, Uninstall and Reinstall
Open Control Panel > Uninstall a program
Uninstall OneLogin Active Directory Connector
Wait for uninstall to complete
Move C:\ProgramData\OneLogin, Inc folder to a staging folder temporarily in case of an issue
Run the .msi installer from ADC folder
Enter the Installation Token
Enter the service account credentials
Wait for the installation to complete
If there are customizations to be made to the config file:
Stop the ADC service
Make a copy of the existing new config file in case a reversion is necessary
Copy the XML sections over from the old config file to the new config file
Double check that the customizations are being place in the correct XML leaf
Start the ADC service
Review the portal for the health of the ADC
It may take a few 15-minute sync cycles before it is showing healthy and the correct ADC version
Double-check that the instance shows the server name. Either Name and/or Hostname or IP can be edited with the name of the server hosting the instance
There is a log under Event Viewer. This log will show a few errors if there are any trusts due to the service account not having permissions to the other domains.