1. Sign In - Account Setup and Login
AI CTRL Secure Chat uses your organization's existing authentication system, so there's no need to create a new account or remember additional passwords.
To sign in:
Navigate to your organization's AI CTRL Secure Chat login page
Click the "Continue with SSO" button (SSO will be replaced with the name of your company’s SSO provider)
You'll be redirected to your organization's authentication provider (Azure AD/Entra ID, Okta, etc.)
Enter your normal work credentials
You'll be automatically signed in and taken to the main chat interface
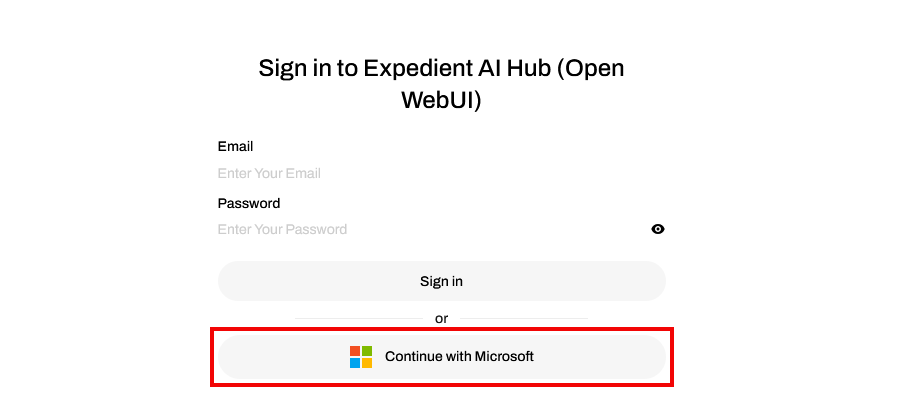
Note: The login page displays "Sign in to Open WebUI" due to the underlying platform, but you're accessing AI CTRL Secure Chat.
2. Start Your First Conversation with AI
Once you're logged in, starting a conversation is simple:
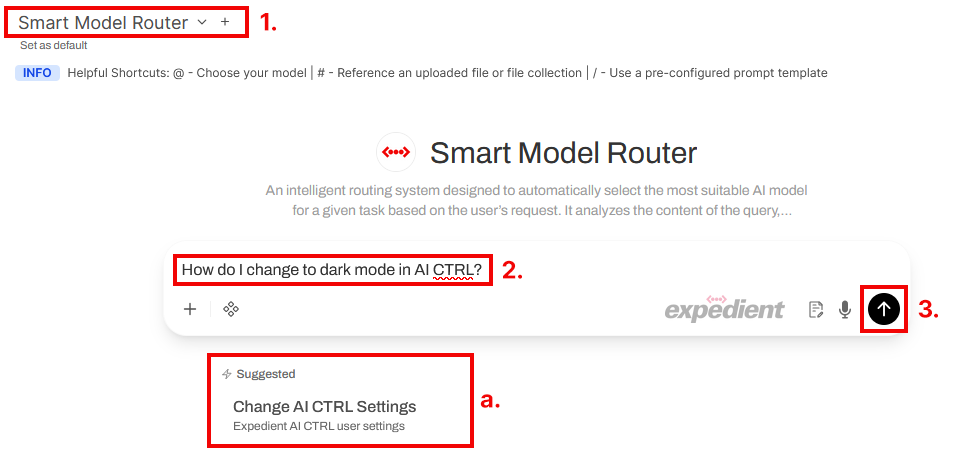
Choose a Model: Click on the model name at the top of the chat area to select an AI model. The “+” button allows you to select multiple models at once. Smart Model Router is the best option if you’re not sure.
Enter Your Prompt: Click in the text box and enter your prompt or describe your task
Send Your Message: Click the arrow button or press Enter to send
Tips for your first conversation:
Try one of the prompt suggestions from below the the text box if you don’t know where to start. The suggestions change based on your input.
3. Continue your conversation
Continue conversation: Continue the conversation by asking additional questions
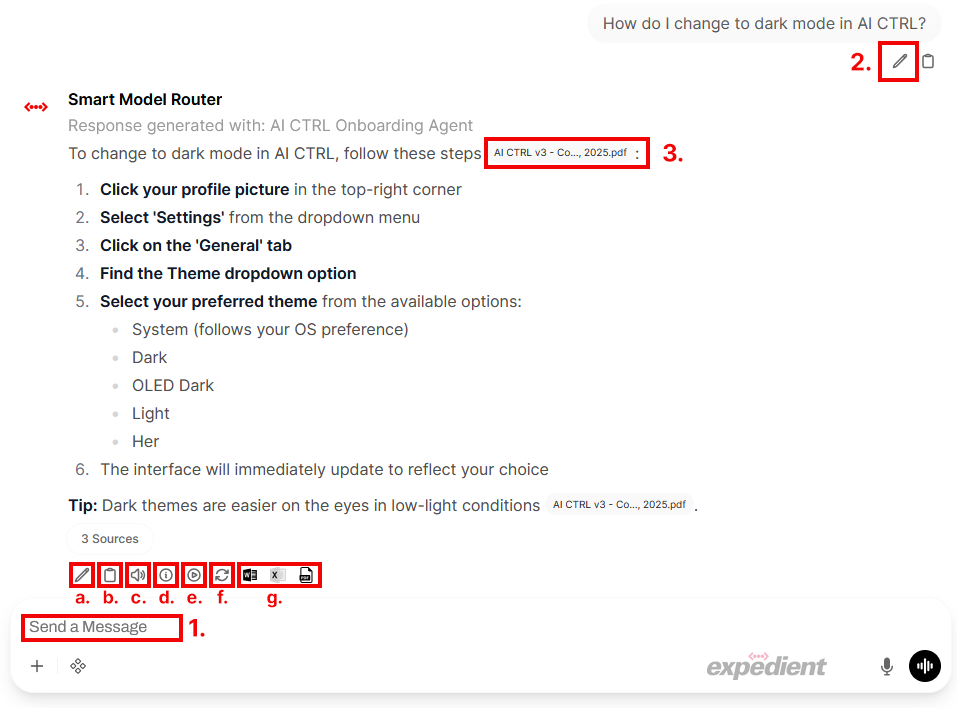
Edit original prompt: Edit your original prompt and regenerate the response using the edit option or the regenerate button (f.) below the response.
View References: If your conversation references attached documents the response will include citations. You can click on the citation to view a pop up with the raw text.
To view the original file click on the title of the citation pop up.
Response options
Edit response: Edit the text of the response. This is useful if the response was mostly correct but you need adjust a few small things before continuing the conversation
Copy: Quickly copy the response to your clipboard.
Read Aloud: Voice to text will read the response over your speakers
Information: Show all the technical information about your response
Continue Response: Continue the prompt and have it generate more
Regenerate: regenerate with options like “more concise.”
Export: Export the response as a Word, Excel, or PDF document. (Excel will only export tables)
4. Attach data to your prompt
You can attach additional information to your prompt at any point in your conversation. 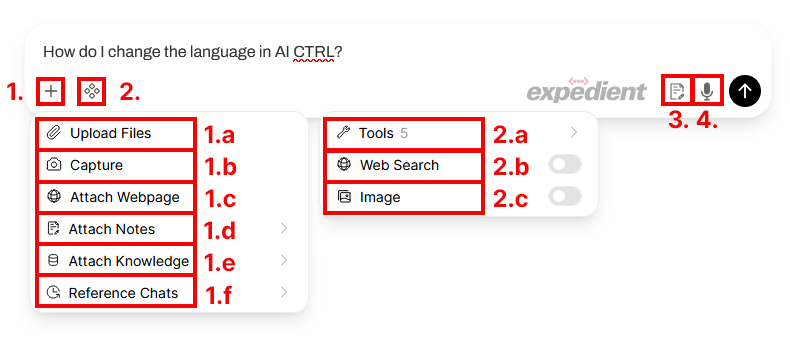
More: pop up menu allows you to attach files or data to your chat
Upload Files: Opens an upload window for files containing text
Capture: Takes a picture with your device’s built in camera. Any text will be recognized and forwarded to the model
Attach Webpage: Attaches the text contents of a website as context for your prompt
Attach Notes: Attaches notes saved in the platform. If you don’t have any notes saved (see sidebar) nothing will appear.
Attach Knowledge: Attaches collections of knowledge users have saved to your deployment and shared with your user
Reference Chats: Allows you to include a prior chat for context. All information and files in that chat will be available for context in your current chat.
Integrations: Tools that enable additional features
Tools: a category of integrations. Connections to company documents (Like SharePoint or Dropbox) are listed here
Web Search: Will automatically search the internet for relevant content and attach it as context.
Image: Will generate an image based on your prompt (Defaults to 1024×1024 sized image)
5. Sidebar Features
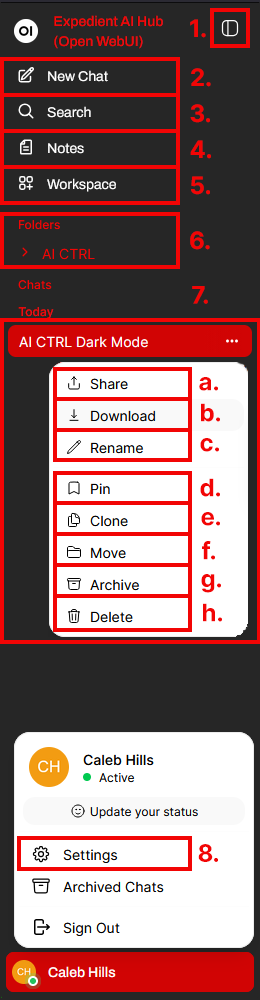
Toggle Sidebar: Click the OI Button at the top of the sidebar to show the sidebar
New Chat: Opens a new conversation
Search: Search through prior chats
Notes: A built in notepad in the platform. Any notes taken can be attached to conversations
Workspace: Where you can create custom models, knowledge, and prompt templates
Folders: A way to group related chats together. You can set a system prompt to apply to all chats in a folder as well as attach knowledge
Past Chats: Using the three dots next to each chat you can then share (a.), download (b.), rename (c.), pin (d.), clone (e.), move (f.), archive (g.), or delete (h.) each chat.
Access Settings: Click your profile picture in the top-right corner or bottom left corners.
You're now ready to start using AI CTRL Secure Chat! The next sections of this guide will help you understand AI basics and explore all the powerful features available to you.