Expedient Enterprise Workspace - Preparing and Importing VM Templates
Within the Expedient Enterprise Workspace platform, virtual desktops instances (VDIs) are derived from "images" - which are standardized templates designated for use, and designed to be cloned on demand. Images are VM templates (in either OVA or OVF format), which are then imported and formatted into Images. Images are then designated and cloned on demand by the platform to serve virtual desktop instances (VDIs). You can create your own VM templates and import them from your environment. Or alternatively, upon request, Expedient can provide a standardized VM template ready for immediate use. Whether you are using an Expedient-provided VM template, or a custom VM template from your own environment, the VM template must be imported and converted to an Image before it can be used as a virtual desktop instance (VDI). This document provides information on how to prepare a custom VM template for use as an image, as well as how to import a VM template. Converting the VM Template into an Image is covered in a separate document.
To import a VM template and turn it into an image, there are two options:
Use an Expedient-provided VM template, then import that into your VDI environment. Expedient VM templates are ready for use and do not require additional action.
Use a custom VM template from your own environment. Your template must be standardized, as described below. After it is standardized, it must then be imported into your VDI environment.
If you are going to use an Expedient-provided VM template, please skip ahead to the "Importing VM template" section below.
If you are going to use your own custom VM template, please follow the steps in this document in full.
Prerequisites for a VM template for use as a VDI image
To prepare a VM template and ensure compatibility with the Expedient Enterprise Workspace platform, your VM must have base configurations in place:
The operating system (OS) must be Windows 10. Windows Server is NOT supported. Please review VMware's compatibility matrix for more information: https://kb.vmware.com/s/article/70965
VMtools must be installed and up to date on the VM.
NVIDIA drivers must be installed. (ONLY if this template will be used for GPU-enabled VDIs).
Adding NVIDIA drivers will require assistance from Expedient. For more information, please see our vGPU template configuration documentation.
The VM must only have one network adapter. It must be VMXnet3 NIC. E1000 NICs are not supported.
The VM hardware version must be no higher than VM HW version 15. Higher versions are not supported at this time.
OS layer tweaks do not need to be performed yet; VMware provides an optimization tool that you will use later to standardize the OS.
Once the VM has the above requirements in place, convert it to either OVA or OVF format. The OVA/OVF package will be the package uploaded to your EEW environment and later converted to an Image for use as a VDI.
Importing and Preparing VM Templates
The OVA/OVF package - your VM template - must first be uploaded to a fileshare shared with your EEW environment. After it is uploaded, you will be able to console into the VM, install the VMware Horizon Agent, standardize the OS using the VMware Optimization Tool, and then finally convert it to an Image for use as a VDI.
Step One: Upload VM Template to Ctera Fileshare
Expedient provides a fileshare for your EEW service hosted on a Ctera filer. To access and upload your OVA/OVF package, please follow the steps as outlined in the following KB: https://kb.expedient.com/docs/login-to-cloud-file-storage
Step Two: Import VM Template
After the package has been uploaded, login to your Horizon DaaS admin portal. Click on "Imported VMs". Locate the VM you would like to import. Choose "Import" to begin the configuration and import process.
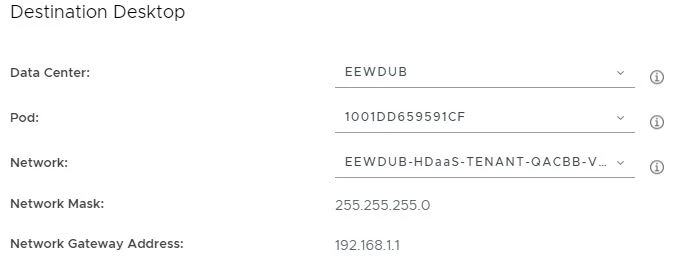
Leave Data Center, and POD to their default values.
Choose "Network" and select your Tenant Network
Choose "Fileshare" and choose your Ctera fileshare if it is not already populated.
Choose "Desktop" and select the VM template you want to import.
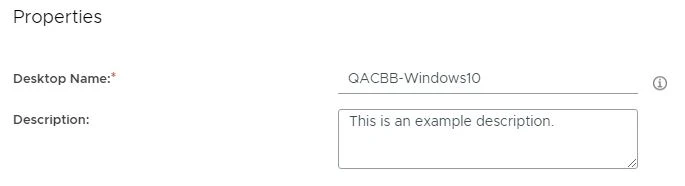
Provide a helpful desktop name and description to suit your needs.
Step Three: Power On and Console Into Imported VM Template
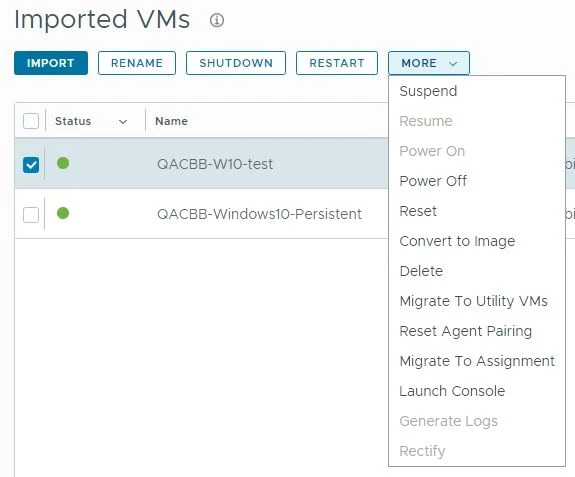
After the VM template has been imported, find the newly imported VM in the list within the "Imported VMs" menu. Power on the newly imported VM, and access the console. These options can be done by check-marking the box to the left side of the row, and then clicking the "More" box above the table.
Step Four: Download HDaaS Agent Installer and Optimization Tool
From within the VM console, you will need to download the VMware Horizon DaaS agent installer, and the VMware Optimization tool. This can be provided by your project manager. If the download information has not been provided, please reach out to your project manager for the URL, username, and password.
Please note that the correct version of the Horizon Agent must be installed based on the OS version that is running on the VM: https://kb.vmware.com/s/article/70965
Step Five: Install HDaaS Agent
Install the VMware Horizon DaaS agent. Please see this article for more information regarding the Horizon Installer process: EEW - How to Install the Horizon Agent
NOTE: If this will be a non-persistent desktop, you MUST ensure the "Instant Clone" option is checked.
Step Six: Run VMware Optimization Tool
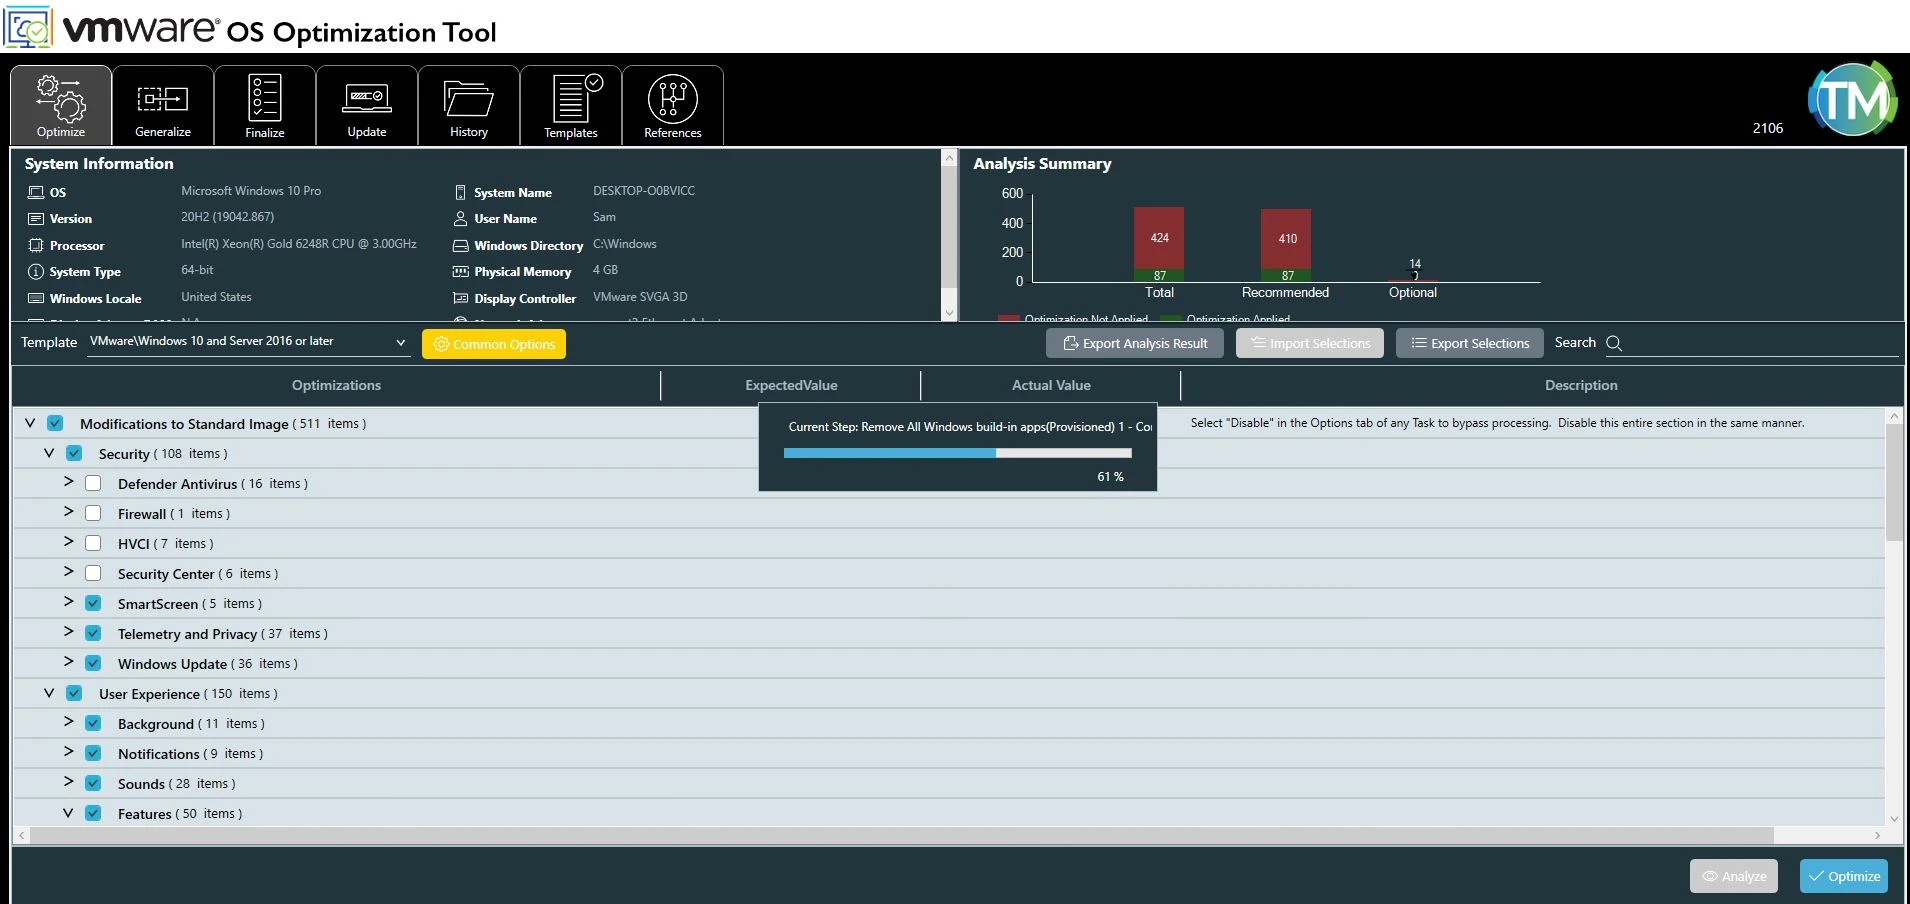
Run the VMware Optimization Tool to optimize the OS of the VM.
Under the Optimize section of the tool, choose "Analyze" in the bottom right corner.
After the Analyze action is completed, review these settings thoroughly. Check/uncheck any options that may not work with your environment. The defaults, however, should be fine.
Click "Optimize" on the bottom right to begin optimization.
Restart the VM once optimization is completed.
Final Steps
After the VMware Optimization has been run and completed, please ensure you have sanitized the VM further (such as deleting any unneeded staging files or installers).
If your template is going to be used for vGPU-enabled VDIs, please validate that the NVIDIA GRID drivers are installed. For more information, please see our vGPU template configuration documentation.
In addition, it is highly recommended to run the following command from a PowerShell window within the VM to avoid sysrep issues during desktop deployments:
|
Once all of these steps are completed, the VM template is now ready to be converted into an Image.
Please refer to the following document to create a new image and begin deploying VDIs: https://expedient-cloud.atlassian.net/wiki/x/-YJiB
See Also
Preparing Custom Templates VMWare KB: https://docs.vmware.com/en/VMware-Horizon-DaaS/services/horizondaas.tenantadmin910/GUID-12F9DB30-66D1-4EB4-939F-CFECDA0EBF57.html
Import Images VMware KB: https://docs.vmware.com/en/VMware-Horizon-DaaS/services/horizondaas.tenantadmin910/GUID-514DA76B-47D7-4762-B180-ECB273374398.html#GUID-514DA76B-47D7-4762-B180-ECB273374398
Gold Image Standards: https://kb.expedient.com/docs/gold-image-standards-1
vGPU Template Configuration: https://kb.expedient.com/docs/configurations-for-gpu-enabled-desktop-templates-1