Nutanix File Servers deployed through Prism Element can be protected and replicated to a remote cluster through a Protection Domain (PD). A Protection Domain is created on the primary/source cluster when a File Server is deployed. The PD takes local snapshots by default but can be configured to replicate the snapshots to a remote cluster.
For pairing a remote site, please see: Pairing Remote Sites in Prism Element
Protection Domain Disaster Recovery
Nutanix File Servers being replicated to a remote site do not have a “baked-in” testing option. A valid testing option, however, is cloning the File Server on the target/remote site from one of the snapshots that is configured and replicated from the primary/source cluster.
Files uses Nutanix native snapshots to clone entire file servers. The clone is a thin copy that consumes minimal storage space. File server clones reside on the same container as the original and maintain the original security permissions. During the clone process, you can specify new IP addresses and give the cloned file server a new name. You cannot clone a file server to a different storage container than the original one.
Cloning helps with the following tasks without impacting the original Files cluster:
Creating backups at the primary and secondary sites
Undertaking disaster recovery (DR) tests at a secondary site
Recovering a file server from a specific point in time
Spinning-up a file server at the primary or remote site for testing or development purposes
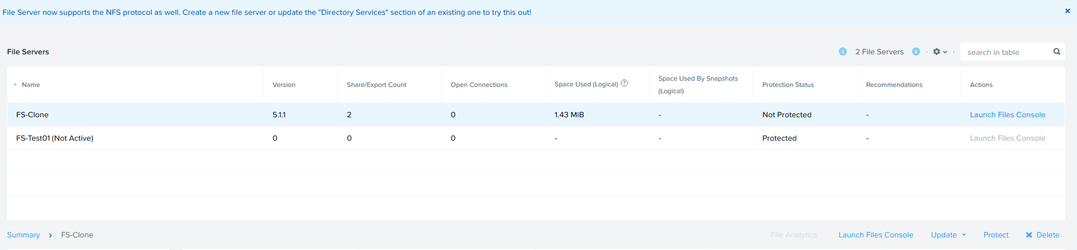
The file server clone is not protected by default. Be sure to enable the protection domain if you want the cloned file server protected. Files cannot clone snapshots taken in earlier releases. Also, file server clones cannot be replicated or migrated to clusters that use earlier AOS and Files versions.
Clone File Server on Remote Cluster
You must log into the Prism Element UI directly in order to clone a File Server. Opening the Prism Element cluster through Prism Central will generate an error when trying to clone the File server stating it must be done from Prism Element.
You can access your Prism Element directly from the FQDN or IP address, or you can find a link from Cluster Quick Access on the main Prism Central infrastructure dashboard.

Prerequisite
You will need to have a working domain controller at the target/recovery cluster. File server clones are not guaranteed to work without a valid domain controller for DNS.
Log into the Prism Element cluster on the target/recovery side of replication
In the dropdown menu, navigate to File Server
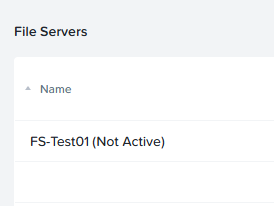
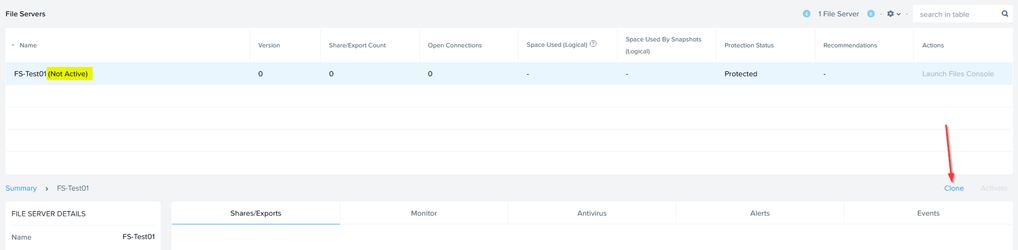
On the File Server screen, you should see the name of the file server along with (Not Active), indicating this is the replicated File Server, not the production/active one
Click on the file server, and then on the right side of the screen, you should see the ‘Clone’ option appear
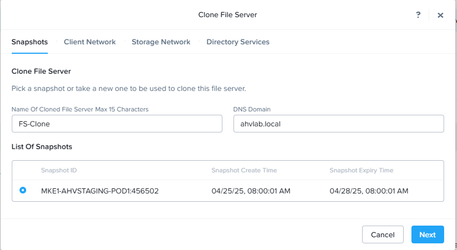
Click Clone to open the Clone File Server
On this screen, enter the name of the cloned File Server, along with the domain it should join. Select which snapshot to clone as well.
Click Next
On the Client Network tab, select the VLAN that the File Server NIC should be on
The ‘Client Network’ is the network that communicates between the File Server VMs, as well as connectivity to DNS, AD, and LDAP.
Scroll down to provide subnet, gateway, IP address for the client network NIC, along with DNS & NTP servers.
Click Next

On the Storage Network tab, the storage network will always be the same network as the CVMs (Native Mgmt network)
Fill in the subnet, gateway, and provide an IP address (or multiple IP’s if more than 1 FSVM in the Files deployment)
Click Next

On the Directory Services tab, provide the necessary info for either SMB or NFS.
If using SMB, you will need to provide the AD realm, and a domain admin user & password.
Domain username should be user@domain.local

After the tasks are complete, the new File server clone is available for use
Deleting Cloned File Server
After testing on the cloned File Server has been completed, it can be deleted from within the “File Servers” menu.
When deleting the cloned File Server, DO NOT delete the associated storage container!
The delete window provides an option to remove the storage container. Do not check that box, as that will remove the underlying storage container used for File Server replication.
Select the cloned File Server and click Delete towards the bottom right side of the screen.
